
Table of Contents
Author’s Note: I wrote the first edition of this ThrottleStop guide for UltrabookReview as part of a short undervolting/tweaking guide several years ago. I previously published a ThrottleStop guide for Notebookcheck back in 2017, but wanted to update the guide here to cover the new features and changes, as well as improve the readability and organization.
The latest current stable version of ThrottleStop can always be found at TechPowerup, and at the time of this article’s latest update is Throttlestop 9.7, updating the tuning options in the FIVR interface for unlocked Intel 10th-gen on newer HX/K processors, as well as offering various other improvements such as the ability to adjust Turbo power limits and PROCHOT offset values per profile or an updated RAM monitoring method.
A more recent ThrottleStop 9.7.3 beta version is also available (released April 2025). It adds support for Arrow Lake hardware, among others.
What is Throttlestop and how does it compare to Intel XTU?
ThrottleStop is an original program by Kevin Glynn, a.k.a. “UncleWebb”, which in simple terms is designed to counteract the three main types of CPU throttling (Thermal, Power Limit, and VRM) present in modern computers.
It started as a simple means to counteract some throttling mechanisms used in older laptops, check temperatures, and change CPU clock speeds. Initially much simpler and more limited than Intel’s Extreme Tuning Utility (XTU), ThrottleStop has grown in feature set and stability over the years, and can be used for undervolting, “set-and-forget” temperature/clockspeed profiles, benchmarking, SST tweaking, and temperature monitoring.
In theory, XTU’s main advantage over TS was to be able to set PL limits and undervolt settings that would be kept applied automatically and would not require the program to keep running in the tray (as TS does). However, there have been quite a few bugs with XTU involving lost settings and frequent hard crashes upon resume from sleep, and for those reasons I have personally abandoned XTU in favor of TS. If you are reading this guide and plan to switch to TS from XTU, be sure you reset your XTU settings to default, uninstall it, and restart your PC before starting TS for the first time. Failure to do this can result in ThrottleStop reading your XTU-tweaked CPU register settings as the defaults (which they are not).
You might be thinking that these kind of programs are for the most advanced users or geeks who spend days trying to get their benchmarks a few points higher or temperatures 1-2C lower. While those stereotypes might be true for some TS users, the fact is that a few minutes of tweaking with the program will likely provide you with significant objectively measurable decreases in temperatures and increases in battery life and real-world performance.
: Lower Temperatures, Increase Performance and Battery Life")
A standard disclaimer when adjusting voltages and other settings on your CPU. There has never been a CPU damaged by this software to my knowledge.
Throttlestop Download, Installation and first-time launch
Hopefully, I’ve made my case for why you might want to install TS and give it a try. Luckily, there isn’t much to downloading and installing TS. You can find the latest version of ThrottleStop linked at the top of this article or at its TechPowerup homepage.
After that, simply unzip the archive into a folder in a location of your choice (I like to keep a dedicated folder for tweaking utilities in my /Program files directory). I wouldn’t recommend installing it to the desktop if you have any intention of using the app, because later we will be automating the startup of the program using Task Scheduler, and if you move the TS director after doing so, you’ll need to do that all over again.
Once you’re ready to begin, double-click “Throttlestop.exe”. You will see a disclaimer regarding melting your computer; read it and then click “OK”. (I do not believe TS has ever melted anyone’s computer.)
After first opening ThrottleStop, you will be greeted by the main window of the program interface. It’s important to remember that all settings you see in ThrottleStop will be initially set to the default settings that your manufacturer has set for your CPU. If you ever want to revert back to your original settings for troubleshooting or benchmarking purposes, simply go to your ThrottleStop folder, locate the “ThrottleStop.ini” file and rename it or delete it, then shut down your computer cold before starting it (not restart). This will clear any settings or registers set by the program.
Note: If you get an error that TS could not be started because a file called “MFC120u.dll” could not be found, you will need to download and install both the 64 and 32-bit 2013 Visual C++ Redistributable Packages.
: Lower Temperatures, Increase Performance and Battery Life")
If you ever run into problems with your settings causing immediate crashes or all else fails, delete the ThrottleStop.ini file to reset all changes you’ve made.
The interface
We’re going to now go over the main features and terminology you will need to know to make your way around TS. If this is your first time tweaking your CPU registers, a lot of this terminology will be new to you. However, once you grasp the basic meaning and functions of each setting, tweaking will start to become second nature to you. As this is the latest edition of this guide, let’s start by introducing the newest features.
Note: This article was originally based on a previous version of Trottlestop and later updated with new info and details on the updated features. Some of the images are still from the original article, and will be updated in due time.
: Lower Temperatures, Increase Performance and Battery Life")
The main window of ThrottleStop 8.70.6. Also accessible from here are the options panel, TS bench utility, FIVR (voltage), and TPL (turbo limit) snap-ins.
Some of the latest Features
Custom Logo – Starting with TS 8.70.5, it is now possible to customize the app with your own custom graphic. This can be done relatively easily by adding an image to the TS main directory called “logo.png”. The image can have a maximum size of 230×90 or less.
MHz/VID Min – You can quickly minimize the TS app by clicking on either the numbers next to the VID or by either of the MHz readings. Note that the app will minimize to either the tray or the taskbar depending on how the app is configured.
: Lower Temperatures, Increase Performance and Battery Life")
Clicking either the VID or MHz values will immediately minimize the app to your location of choice.
Main Window: Bottom
In the bottom bar of the main TS window you will see some buttons with basic functions: Save, Options, Turn Off(On), TS Bench, Batt, GPU, and a collapsing arrow to hide this bar.
Save – Saves the current settings to the ThrottleStop.ini file (found in your TS director).
Options – Goes to the options menu for ThrottleStop.
: Lower Temperatures, Increase Performance and Battery Life")
Clicking the “Options” button will open the options snap-in (right). Here, you can rename the 4 possible profiles, set tray icon settings, enable temperature alarms, battery profiles and monitoring, closing app behavior, and HotKeys. We will return here later when we setup profile alarms based on temperatures.
Turn On/Off – The developer has recently admitted that while this button used to do something years ago, it basically doesn’t do much anymore. Assume that TS will be governing your CPU as long as the program is running.
TS Bench – Opens a built-in benchmarking program. Though not strenuous, it is useful for detecting how recent tweaks you made will affect your CPU under load. In the top left area of the window, you will see four radio buttons. Each one has a customizable name (in the Options dialogue) and each refers to a separate settings profile for the program. A few settings are universal across all profiles, but most settings are profile-specific. We will discuss using more than one profile later.
: Lower Temperatures, Increase Performance and Battery Life")
TSBench is a handy tool to not only measure performance quantitatively with different loads, but also testing to see whether sustained performance is improved with your currently active settings/tweaks.
Main Window: Left
On the left half of the window you can find general settings that affect either CPU clocks or the way the program functions:
: Lower Temperatures, Increase Performance and Battery Life")
Outside of Undervolting, done in the “FIVR” snap-in, this section is where you will find most of the settings you will likely use to determine the behavior of your CPU.
Clock Modulation/Chipset Clock Modulation – These settings were designed to counter an older method of throttling which told the CPU or chipset to run at a percentage capacity. For most newer chips, this method is not used, and enabling the feature in ThrottleStop will have no effect.
Set Multiplier – This is another obsolete setting; on older CPUs, the clock speed is determined by multiplying the bus speed of the CPU by a multiplier. For example, an old Pentium III-M with a bus-speed of 133MHz set to a multiplier of 10 would be operating at its full speed of 1.33GHz. On modern CPUs, the multipliers are set differently. With a Core i CPU, simply increasing the default value by 1 will tell the CPU to run at full turbo clocks. Setting it higher will have no effect, and setting it lower will be the same as not setting it.
Speed Shift – EPP (Energy Performance Preference) – Starting with Intel’s Skylake, this became the new low-level (non-software) method for governing CPU behavior. It replaced the older “SpeedStep” technology, which required software-level governance. This means that EPP should be significantly more efficient and effective than SpeedStep was. If you have a Skylake CPU or later, this should be enabled. Note: On some Skylake machines (such as the DelL XPS 15 9560), this feature was never enabled via BIOS/firmware, despite that the chipset supported it. If your system has a Skylake or later CPU but it is not enabled by default in the BIOS, you can enable it by going to the “TPL” button and checking the “Speed Shift” option in that dialogue box.
Speed Shift – EPP operates with values between 0-255, where 0 means the CPU will prefer its maximum frequency (into the turbo range, assuming you have not checked “disable turbo”), and 255 means the system will prefer running the CPU at its lowest base clocks. I would recommend a setting between 0-32 in whatever profile you will use while plugged-in or want maximum performance on, and at least 128 for your unplugged/power-saving profile. You can play around with this setting yourself and watch how the clocks change while performing a strenuous task or running TSBench. This, along with “disable turbo” and the maximum turbo clocks under FIVR are the main variables you will likely want to adjust when creating different TS profiles.
Power Saver – Power Saver is a legacy feature that isn’t necessary on modern CPUs. Only available when turbo boost is disabled, Power Saver will tell your CPU to reduce its clocks to minimum when idle. This feature is redundant on anything newer than a Core 2 Duo, I believe.
Disable Turbo – This option will disable the turbo boost ability of your CPU when checked. For example, an i7-7700HQ has a base clock of 2.8GHz but can turbo up to 3.8GHz for a single-core workload. If you had tas this CPU and checked this box, the CPU will never attempt to boost above its base clock of 2.8GHz. This is useful when trying to limit spikes in power consumption (such as on VRM-throttling machines like the XPS 15 9550/9560/9570) or just in controlling temperatures when a dedicated GPU is in use as well.
BD PROCHOT – Short for Bi-directional Processor Hot. PROCHOT is an emergency throttling method triggered when a CPU hits its maximum temperature (100 or 105C). You will often see this triggered on MacBook Pros, for example. Bi-directional PROCHOT is a system some laptops use where the CPU will be throttled when another component, such as a GPU, reaches a set temperature even though the CPU has not his its maximum operating temperature. Disabling this box should disable this feature, meaning a hot GPU temperature trigger should not cause CPU throttling. Be aware that this may result in even higher chassis temperatures, and I would not recommend disabling it.
Task Bar – Ticking this check box will prevent ThrottleStop from minimizing to the tray and instead will keep it in the Taskbar. Set this to your preference. Note that this also determines where TS will minimize to by clicking on VID or MHz.
Log File – This will create a timestamped text log in your ThrottleStop folder. This is useful when you record your clocks and temperatures by the second during a benchmark. Keep it off when not needed.
Stop Monitoring – Clicking this will toggle the sensors and recording abilities of ThrottleStop.
Speed Step – On older CPUs (pre-Skylake), toggles the software-level governance of CPU clockspeeds.
C1E – This should be kept on anytime you are mobile or do not need the absolute minimum in system latency (DAW work, etc.). Turning off this option should prevent the turbo boost from shutting down cores automatically. When off, clocks should stay near maximum and the CPU will use more power.
On Top – This keeps the ThrottleStop window on top of any other windows.
More Data – Logs data at eight times per-second instead of once per-second.
Main Window: Right
: Lower Temperatures, Increase Performance and Battery Life")
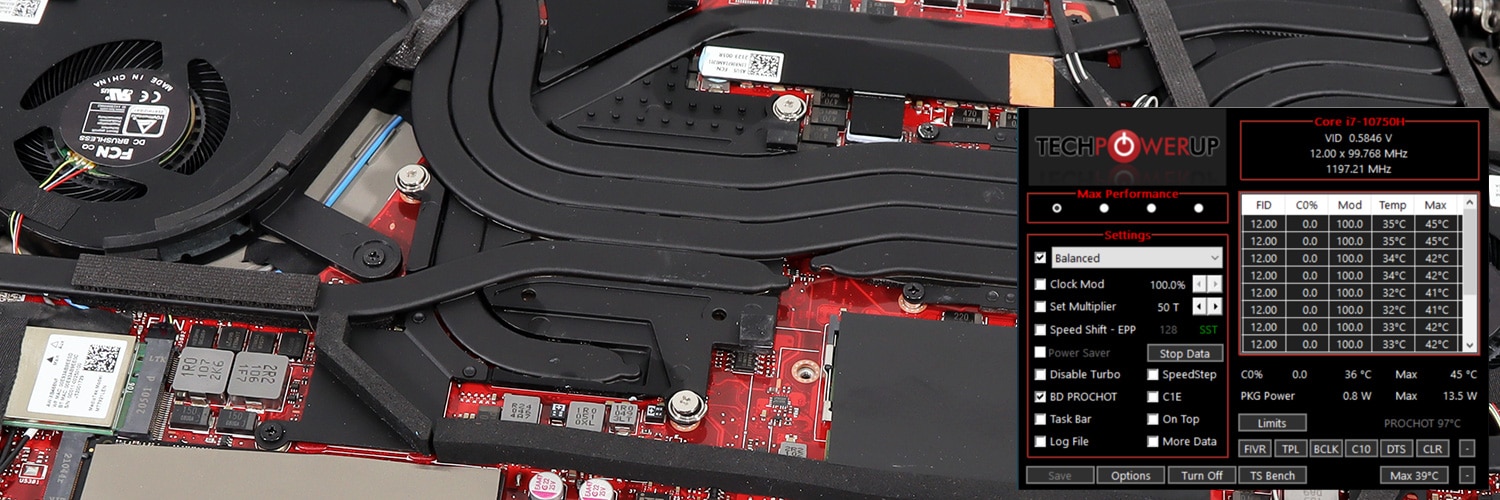
The right side of the TS interface is more for monitoring purposes, though there are a few clickable elements.
The table will be headed with your CPU model, current voltage, and clock speed. In the table, each entry here represents one of your CPU’s threads. In the above screenshot, you can see that my CPU, a 6-core Intel Core i7-9750H, has 12 threads visible. If you were to turn off hyperthreading in BIOS, you would only see 6 in this window.
| FID | C0% | Mod | Temp | Max |
| Frequency identifier/clock multiplier. This is usually equal to the current CPU frequency divided by the FSB clock. | Percentage of time the CPU thread is in its highest-performance state (C0). This should be lower when idle and higher when under load. | Refers back to the “Clock Modulation” options. Should read 100% on a modern CPU. | Current temperature reading (C) of that CPU core/thread. | The highest temperature reached by that core/thread. On a properly functioning thermal solution, the maximum temperatures of all cores and threads should be within a few degrees C of each other. This is useful for determining if you have a warped heatsink or poor thermal paste application. Can be cleared by clicking the “CLR” button below the readout. |
Package Power – An estimate of how much power your CPU is drawing as a whole.
Temp – The current reading of the chip sensor (C). Note that this is often different than the individual core temperatures.
Limit Reasons – The two boxes here, one radio and one tick, serve to notify the user if any throttling has occurred. If TDP Throttle’s radio box is filled, then that means the CPU has throttled due to Thermal Design Power (TDP) restrictions. For example, if you have a laptop with a 135W AC adapter powering an i7-9750H and Nvidia GTX 1650, running an intensive game or benchmark may cause the combination of these components to exceed the total TDP allowed for the system, and thus it will throttle. If the PROCHOT [#]C box is ticked, then the CPU has at some point hit its OEM-designated max temperature. In the case of my ThinkPad X1E Gen 2, was set by Lenovo to 92C in a previous BIOS update.
: Lower Temperatures, Increase Performance and Battery Life")
FIVR, TPL, and C[#] are the more technical modules.
CLR will reset throttling and temperature records.
Clicking DTS will simply change the temperature readings into degrees from the thermal limit rather than an absolute temperature (i.e. 25 DTS would mean 80C, 0 DTS would be 105C on many chips).
C#% will show the status of each of your CPUs threads in terms of its power state and utilization. This is useful when tracking down rogue programs and optimizing battery life.
BLCK sends a request to recalculate the bus and clock speeds of your CPU when pressed.
TPL is the Turbo Power Limit module, which is mostly useful for enabling Speed Shift on supported notebooks that don’t have it enabled in a BIOS update (i.e. the XPS 9550 and 9560). On some machines, some users have claimed to be able to set PL1 and PL2 limits through this module, though I personally have not been able to do so.
FIVR stands for Fully Integrated Voltage Regulator, and this is where we will soon go to undervolt our CPU soon. First, though, let’s take a trip back to the options to
Options
: Lower Temperatures, Increase Performance and Battery Life")
Use the Options dialogue to set up alarms and profiles for automatic functionality.
Before we go into undervolting, it’s important to set some options first. You may wish to give each profile a name or number so it’s easier to keep track of them. I recommend setting at least one profile to AC and one for battery, as well as “Start Minimized” and “Minimize on Close”, as I always run TS in the tray on all my computers. If your computer has a dedicated GPU, check the box corresponding to your card (Nvidia or AMD). Once you’ve chosen your GPU (if any), close and re-launch ThrottleStop for the settings to take. Now you should be able to see your GPU temperature displayed below your CPU temperature. It may be worth noting that if you don’t plan to use your GPU temperature to trigger any secondary profile, then you won’t need to check this box. It is possible that polling the GPU temperature may wake it up on occasion, but I doubt it will have any significant effect on battery life either way.
Undervolting with Throttlestop
The first thing we’ll do is reduce temperatures and power consumption while increasing performance by undervolting. Undervolting slightly reduces the voltage supplied to the CPU. The first thing people ask is “why doesn’t Intel do this by default?”, and the answer to that is that every chip is different: some can undervolt to -160mv, others only to -60mv. Silicon manufacturers like to give a bit of headroom just in case, though some OEMs like Apple and Razer are now undervolting their notebooks’ CPUs out of the factory. You will still be able to undervolt a pre-undervolted chip, but don’t expect to see as much of an improvement as you would otherwise, of course.
There is no risk to undervolting (unlike overvolting), and the worst thing that can happen if you try to undervolt too much is that you will get freezes or BSODs (often under stress tests, but also at idle). To test an undervolt, run a benchmark. Sometimes it will crash immediately and you will know you have undervolted too much. Other times, an undervolt will work for benchmarks, but can lead to crashes on idle. In my own experiences, I find that undervolts are least stable on battery. If your undervolt is stable at idle and load while on battery, you can be sure it will happily run at those values when on AC power. If you do get a crash (often a BSOD, but sometimes a hard freeze), try reducing all your undervolts by 5mv at a time and see if the problem persists. Generally, too much of a CPU undervolt manifests itself in a freeze or BSOD, while too much of an Intel GPU undervolt will lead to a crash when running a graphics benchmark.
: Lower Temperatures, Increase Performance and Battery Life")
The FIVR module: Here is where the undervolting magic happens. We are mostly interested in undervolting “CPU Core” and “CPU Cache”.
Click the FIVR button to go to Turbo FIVR Control. You will see a lot options and sliders here, this process is actually very simple. Check to make sure you have the right profile selected (voltages can be profile-specific) then check the “Unlock Adjustable Voltage” box under “CPU Core Voltage”. There are 6 elements under “FIVR control”, but we only care about three: CPU Core, CPU Cache, and Intel GPU. In fact, CPU core and CPU cache should almost always be set to the same value.
Make sure the radio button for “Adaptive” is selected, as well as CPU core, and now we can select an undervolt for it. Only adjust the Offset Voltage. How much you should undervolt depends a fair amount on what chipset you have. In general, modern mobile CPUs undervolt very well (between -125-165mv) while older (3rd and 4th gen Core-series chips) may only be able to undervolt 40-50mv. For this guide, I suggest a conservative undervolt of -80mv for your CPU Core. Once that is done, click “CPU Cache” and perform the same steps. CPU Core and CPU Cache should generally have the same undervolt. It used to be suggested to run a modest -50mv undervolt on the iGPU, but there’s some consternation about this at the moment. Some have claimed this leads to stability issues waking from Standby and does little to reduce temperatures. If you are in doubt, just leave it at 0.
Once you have done Core, Cache, and iGPU, I recommend pressing “Apply”. If the voltages take and it doesn’t crash immediately, select “OK – Save voltages immediately”, as it is very annoying to re-enter all your voltages after a crash during testing. Before applying your undervolts to your other profiles, spend some time using your computer in various scenarios to confirm they’re stable.
Profiles
Once your undervolts have been set, it’s a good idea to set up at least two profiles (if you have a laptop). The first profile should be set in Options to be your AC profile. Check the box for “Battery Profile”, and select another profile to use on battery (see above screenshot of the options for an illustration of this). This will cause ThrottleStop to automatically switch between the two profiles based on whether it is on battery.
Your AC profile should probably be the highest performance one, because there are no considerations needed for battery life. I recommend setting your Speed Shift value to 64 or lower for maximum performance on this profile.
Now click on the box in the main window for whichever profile you want to use while on battery. If battery life is a concern, I recommend checking the “disable turbo” box. Additionally, a more conservative Speed Shift value will help preserve battery life as well. Values from 128-256 are values that are biased towards battery life.
A third profile can be useful as a failsafe to cool off the laptop once a certain temperature has been hit. Go back to the “Options” dialogue box and you will see a section labeled “Alarm”. Rather than making a loud noise to wake you up, this feature will activate a profile of your choice while certain conditions are met. Remember that DTS refers to the number of degrees from max temperature, so a DTS of 1 means 100C on an i7-7700HQ. That is still quite hot, so I like to use a DTS of 20 (80C). Below that, you can enter which profile you want activated (select the number of your “failsafe” profile). Repeat the process for the GPU if you are monitoring it, noting that this box is measured in Celsius and not DTS. This method is quite useful for controlling throttling on machines that have been poorly configured to limit their TDPs, such as the XPS 15 7590 on launch
Click “OK” and navigate to your failsafe profile from the FIVR module. This third profile should be set to be triggered by one or both of your alarms (set in options). This profile should be designed to tame your CPU for various reasons, such as allowing your GPU more power and thermal headroom in a system with a shared heatsink. Once in FIVR, you probably want to lower the maximum turbo frequencies on the lower left. For example, if you set 32 as the maximum multiplier for all operations using 1-6 cores, then your CPU will never boost above 3.2 GHz on that profile. In the main window, you could also play with higher EPP values, such as 128-256. Alternatively, you could check “disable turbo” in the main window on this profile to limit the maximum frequency another way, but given the low 1.x GHz base frequencies of Intel’s chips nowadays, that might reduce performance a bit too much.
Now, when your CPU or GPU hit your desired temperature limit (set by the alarm setting in Options), ThrottleStop should automatically switch to the designated profile until the temperatures drop. Once they drop below the threshold, it will automatically return to your default AC profile.
This method of keeping temperatures in check is often preferable to letting the laptop manage its CPU and temperatures according to the manufacturer’s settings, as this allows you to effectively set your own customized temperature ceiling.
Automating TS to launch on startup
Once you have finished this guide and your computer is running more efficiently, let’s set ThrottleStop to launch on startup using Task Scheduler. There is a step-by-step guide for this written by Kevin himself.
Conclusion
This concludes your introductory guide to the wonderful, performant world of ThrottleStop!
Due to the nature of modern CPUs and variants between systems, there is always a possibility that a feature that previously worked one way may behave slightly differently on newer machines and architectures. If you notice something isn’t quite working as described, try leaving a message here or searching in the archive of the NotebookReview (now defunct) official thread! Happy tweaking!

")
- complete list")
 in 2026")


")
")


Luke
January 27, 2024 at 6:57 pm
Seems PROCHOT is broken. Mine is always stuck at 92c even after changing it in the options and closing/relaunching TS.
Stormie
March 18, 2024 at 6:18 pm
try reseting the sensor loggers in TS using CLR on right menu
mat
December 1, 2025 at 10:11 pm
On version 9.7 most options are locked/greyed but on version 9.2 everything is available.
CPU: Intel I5-14500HX